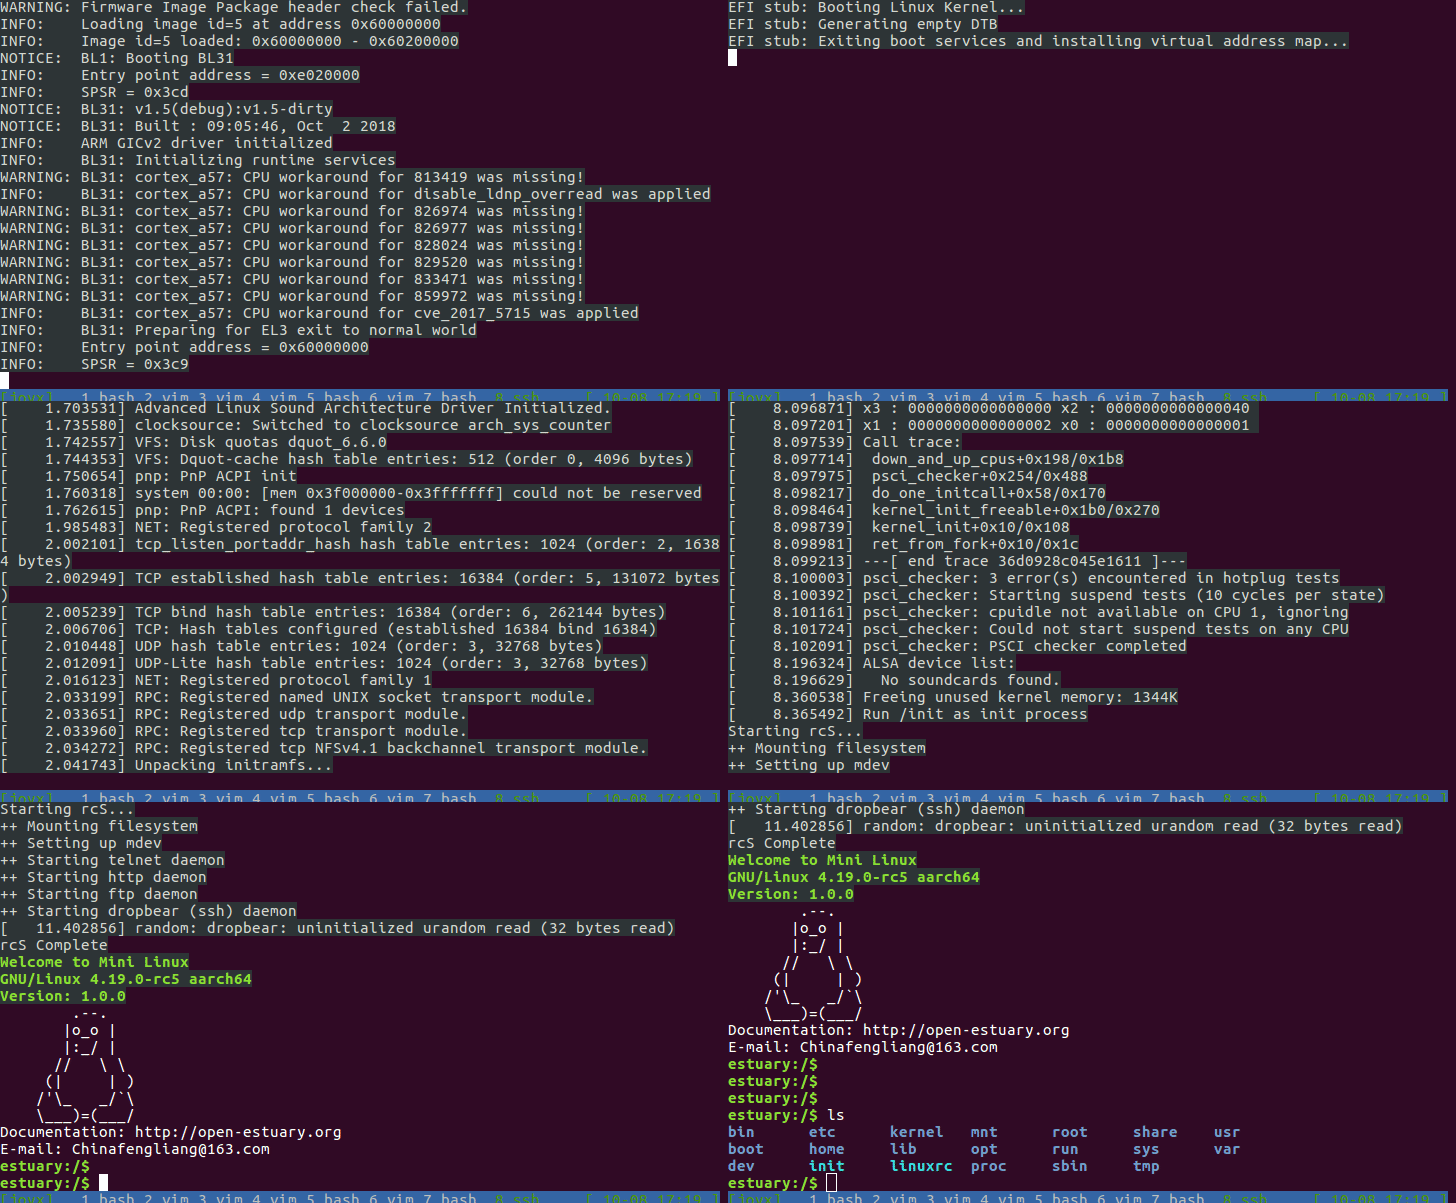
ARMv8架构中引入了很多Exception Level的概念,这里结合ARM的材料,
从整体上从动手角度介绍下ARMv8芯片上电后从EL3到EL1的过程,同时给自己留个记录。
ARMv8系统架构
下面是从YVR18-108:Trusted Firmware for M technical deep dive材料中截取的关于ARMv8系统架构的一页。

拿这一页举例子,只是想说在kernel跑起来之前,一般还有哪些步骤,
当然每家的做法都不一样,这里只是以公版举例子。
无图无真相,先把结果置顶:)

QEMU编译
sudo apt-get install build-dep qemu -y
sudo apt-get install libcap-ng-dev libattr1-dev -y //9p shared virtfs depened
git clone git://git.qemu.org/qemu.git qemu.git
cd qemu.git
./configure --target-list=aarch64-softmmu --enable-virtfs
make
ROOTFS编译
git clone git://git.buildroot.net/buildroot buildroot.git
cd buildroot.git
make qemu_aarch64_virt_defconfig
make menuconfig
QEMU执行ARM64 VM
./aarch64-softmmu/qemu-system-aarch64 -machine virt -cpu cortex-a57 \
-nographic -smp 2 -m 2048 \
-kernel ./Image \
-initrd rootfs-arm64.cpio.gz \
-append "console=ttyAMA0"
增加网络支持
如果只需要和主机能通信的网络:
./aarch64-softmmu/qemu-system-aarch64 -machine virt -cpu cortex-a57 \
-nographic -smp 2 -m 2048 \
-kernel ./Image \
-initrd rootfs-arm64.cpio.gz \
-netdev user,id=user0,hostfwd=tcp::5000-:22 \
-device virtio-net-device,netdev=user0 \
-append "console=ttyAMA0"
之后可以在主机使用ssh root@127.0.0.1 -p 5000 登录虚拟机。
如果需要和外网通信,建议使用macvtap,具体命令如下:
ip link add link eth1 name macvtap0 type macvtap
ip link set macvtap0 up
ip link show macvtap0

./aarch64-softmmu/qemu-system-aarch64 -machine virt -cpu cortex-a57 \
-nographic -smp 2 -m 2048 \
-kernel ./Image \
-initrd rootfs-arm64.cpio.gz \
-net nic,model=virtio,macaddr=$(cat /sys/class/net/macvtap0/address) \
-net tap,fd=3 3<>/dev/tap$(cat /sys/class/net/macvtap0/ifindex) \
-append "console=ttyAMA0"

ip link del macvtap0
增加PCIe热插拔设备
注意4.19内核以后,虚拟机如果使用dts方式启动,必须在命令行append中添加”pcie_ports=native”。
./aarch64-softmmu/qemu-system-aarch64 -machine virt -cpu cortex-a57 \
-nographic -smp 2 -m 2048 \
-kernel ./Image \
-initrd rootfs-arm64.cpio.gz \
-device pcie-root-port,port=0x8,chassis=1,id=pci.1,bus=pcie.0,multifunction=on,addr=0x1 \
-device pcie-root-port,port=0x9,chassis=2,id=pci.2,bus=pcie.0,addr=0x1.0x1 \
-device pcie-root-port,port=0xa,chassis=3,id=pci.3,bus=pcie.0,addr=0x1.0x2 \
-device pcie-root-port,port=0xb,chassis=4,id=pci.4,bus=pcie.0,addr=0x1.0x3 \
-device pcie-root-port,port=0xc,chassis=5,id=pci.5,bus=pcie.0,addr=0x1.0x4 \
-device pcie-root-port,port=0xd,chassis=6,id=pci.6,bus=pcie.0,addr=0x1.0x5 \
-netdev user,id=user0,hostfwd=tcp::5000-:22 \
-device virtio-net-pci,netdev=user0,id=net,bus=pci.1,addr=0x0 \
-device qemu-xhci,p2=8,p3=8,id=usb,bus=pci.2,addr=0x0 \
-device virtio-scsi-pci,id=scsi0,bus=pci.3,addr=0x0 \
-device virtio-serial-pci,id=virtio-serial0,bus=pci.4,addr=0x0 \
-append "console=ttyAMA0"
ARM Trusted Firmware编译
git clone https://github.com/ARM-software/arm-trusted-firmware.git
cd arm-trusted-firmware.git
git reset --hard v1.5
make CROSS_COMPILE=aarch64-linux-gnu- PLAT=qemu
编译过程中如果出现padding错误,请把下面这个patch的改动干掉,如果代码不一样,请找asm_macros.S把align指令后面的0去掉。
https://github.com/ARM-software/arm-trusted-firmware/commit/79627dc37259781e578c47e1e63856dd0424b2a2
执行ARM Trusted Firmware
可以按照这个网页来:
https://github.com/ARM-software/arm-trusted-firmware/blob/master/docs/plat/qemu.rst
记得从这个网址下载QEMU_EFI.fd,这个是QEMU Virt平台的UEFI:
https://github.com/ARM-software/arm-trusted-firmware/blob/master/docs/plat/qemu.rst
务必把下载的QEMU_EFI.fd重命名为bl33.bin
./aarch64-softmmu/qemu-system-aarch64 -machine virt,secure=on -cpu cortex-a57 \
-nographic -smp 2 -m 2048 \
    -bios bl1.bin \
-kernel ./Image \
    -initrd rootfs-arm64.cpio.gz \
       -append "console=ttyAMA0,38400 earlycon root=/dev/vda2 no_console_suspend" \
    -d unimp -semihosting-config enable,target=native
UEFI编译
git clone git://git.linaro.org/uefi/linaro-edk2.git
cd linaro-edk2.git
. edksetup.sh
export GCC49_AARCH64_PREFIX=aarch64-linux-gnu-
make -C basetools
build -a AARCH64 -t GCC49 -p ArmVirtPkg/ArmVirtQemu.dsc
编译后的UEFI会放在:
Build/ArmVirtQemu-AARCH64/DEBUG_GCC49/FV/QEMU_EFI.fd
Kernel编译
git clone https://git.kernel.org/pub/scm/linux/kernel/git/torvalds/linux.git linux.git
cd linux.git
ARCH=arm64 CROSS_COMPILE=aarch64-linux-gnu- make defconfig
ARCH=arm64 CROSS_COMPILE=aarch64-linux-gnu- make -j16
ACPI表格替换
sudo apt-get install iasl
mkdir -p kernel/firmware/acpi
#修改ACPI表格,并编译生成aml,务必生成的aml也要放在kernel/firmware/acpi目录下
iasl -sa dsdt.dsl
iasl -sa facp.dsl

cd kernel
find kernel | cpio -H newc --create > rootfs-top
cat rootfs-arm64.cpio.gz >> rootfs-top
请参考:
https://www.kernel.org/doc/Documentation/acpi/initrd_table_override.txt
Native ARM64
如果是在ARM64单板上直接执行的话,请在QEMU上把cpu换成以下参数
-cpu host -enable-kvm
另外由于KVM不支持secure扩展,所以KVM的情况下,只能和host共用一个ATF。
调试UEFI和kernel
qemu-system-aarch64 -smp 2 -m 1024 -machine virt,accel=kvm -cpu host \
    -bios ./QEMU_EFI.fd \
    -device virtio-blk-device,drive=image \
-drive if=none,id=image,file=./xenial-server-cloudimg-arm64-uefi1.img\
-nographic  \
-net none
其中ubuntu带fat32分区的kernel image可以从这里下载:http://cloud-images.ubuntu.com/xenial/current/xenial-server-cloudimg-arm64-uefi1.img
替换其中的kernel的话,可以执行下面的命令,注意host kernel需要打开CONFIG_BLK_DEV_NBD选项
qemu-nbd -c /dev/nbd0 $guest
sleep 2
mount /dev/nbd0p1 /mnt/
mv /mnt/boot/vmlinuz-4.4.0-97-generic /mnt/boot/vmlinuz-4.4.0-97-generic.orig
mv Image /mnt/boot/vmlinuz-4.4.0-97-generic
umount /mnt
sync
qemu-nbd -d /dev/nbd0
修改root账号密码的话,请参考:https://www.maketecheasier.com/reset-root-password-linux/
- 进到Advanced options for ubuntu
- 进到shell
- mount -n -o remount,rw /
- passwd root
调试kernel
kernel一定要把KASLR Randomize the kernel memory sections选项关掉,
或者在kernel的command line中添加”nokaslr”。
qemu命令行参数加上-s
gdb执行后,先设置断点,再通过target remote localhost:1234挂上QEMU。
如果需要调试guest kernel启动过程,请再加上-S,这样QEMU启动后会停止,
再进入到QMEU控制台(ctrl+a+c),让QEMU执行。
gdb --tui vmlinux_file_path -d kernel_source_dir
调试QEMU
gdb qemu后,设置断点,再通过run加qemu运行参数。
或者也可以通过组合键‘ctrl+a c’进到qemu moniter中,再通过trace-event来跟踪,比如跟踪smmu事件
trace-event smmuv3_* on

